What are the key steps to connect Power BI to SQL?

archijain931


Introduction
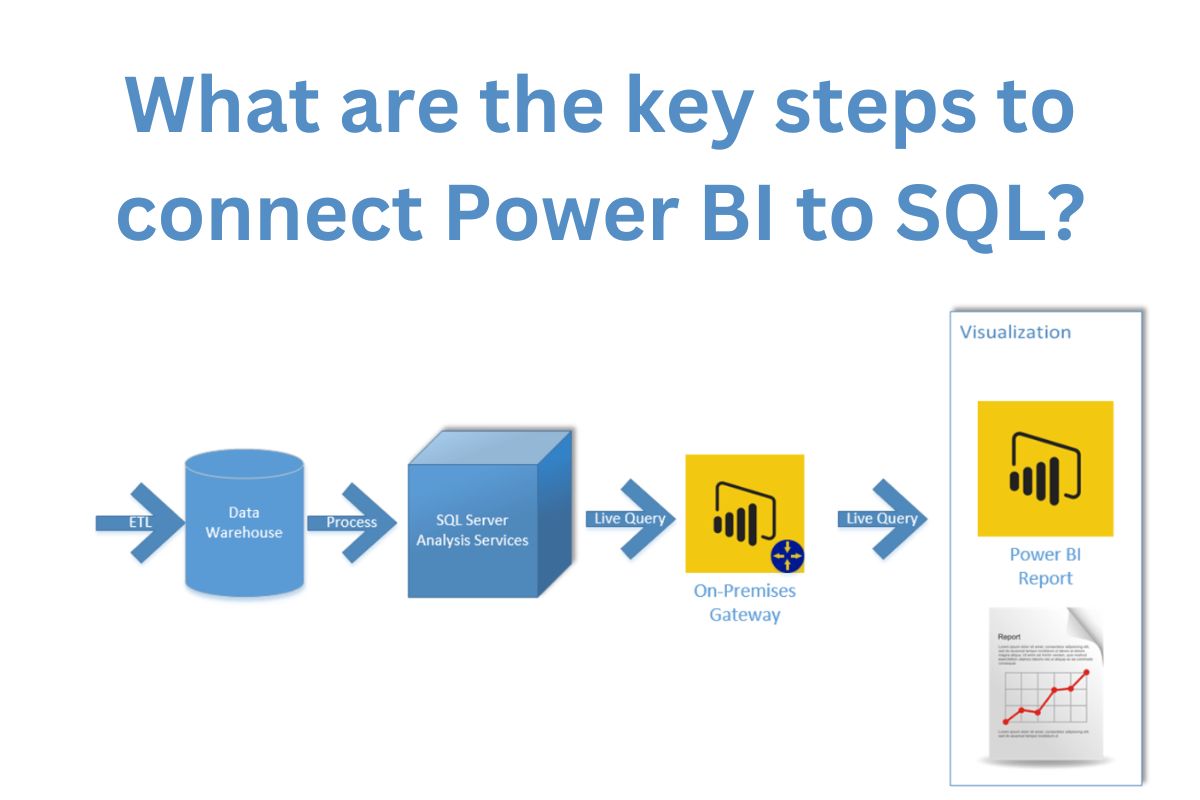
Connecting Power BI to SQL Server is a fundamental capability for leveraging data-driven insights in business intelligence. Power BI, a robust analytics tool developed by Microsoft, enables users to connect seamlessly to SQL Server databases to extract, transform, and visualize data effectively. Understanding the key steps to establish this connection is crucial for anyone looking to harness the power of data visualization and analysis.
Power BI is a powerful business intelligence tool developed by Microsoft. It allows users to visualize and analyze data from a wide range of sources through interactive reports and dashboards. Power BI enables organizations to connect to various data sources, including databases, spreadsheets, cloud services, and online services, consolidating data into meaningful insights.
SQL, or Structured Query Language, is a standardized programming language used for managing and manipulating relational databases. It was initially developed in the 1970s and has since become the standard language for communicating with and extracting data from relational database management systems (RDBMS).
Before you start connecting Power BI to SQL Server, ensure you have Power BI Desktop installed on your computer. You can download Power BI Desktop for free from the official Microsoft website (powerbi.microsoft.com).
Once Power BI Desktop is installed, launch the application. You’ll be greeted with a welcoming screen and a blank canvas where you can build your reports and dashboards.
Now, let’s connect Power BI Desktop to your SQL Server database:
Once connected, Power BI will load a navigator window displaying the tables available in your selected SQL Server database. Here’s how to proceed:
After loading data into Power BI, you can start creating insightful reports and visualizations:
Data in Power BI reports is dynamic, and it’s crucial to keep it updated with the latest information from your SQL Server database:
Once you’ve created and refined your reports in Power BI Desktop, you may want to share them with others in your organization using the Power BI service:
Connecting Power BI to SQL Server is a straightforward process that empowers you to unlock valuable insights from your data. By following these steps, you can efficiently import data, create compelling visualizations, and share your findings with stakeholders. Whether you’re a business analyst, data scientist, or IT professional, mastering these steps will enhance your ability to leverage data for informed decision-making and strategic planning. To deepen your understanding and proficiency in data analytics tools like Power BI and SQL Server integration, Consider exploring resources like a Data Analytics Training Course in Indore, Delhi, Gurgaon, Noida, or other nearby cities in India .Start harnessing the full potential of your data today!
Connecting Power BI to SQL allows you to leverage data stored in SQL databases for creating insightful visualizations and reports. It enables you to analyze business data in real-time, make informed decisions, and communicate insights effectively across your organization.
Power BI Desktop is a free application from Microsoft used to create reports and dashboards. It’s essential for connecting Power BI to SQL as it provides the interface where you can import data, transform it, and design visualizations before publishing to Power BI Service (cloud-based).
To connect Power BI to SQL Server, launch Power BI Desktop, click on “Get Data,” choose “SQL Server” from the list of data sources, enter the server name and credentials, select the database, and load the desired data. You can then start building reports based on the imported data.
Yes, Power BI supports connecting to various SQL databases, including Microsoft SQL Server, MySQL, PostgreSQL, Oracle Database, and others. The process of connecting is similar across different SQL database types, requiring server details and authentication credentials specific to each database.
You can use either Windows Authentication or Database Authentication (username and password) to connect Power BI to SQL Server. Windows Authentication leverages your current Windows credentials, while Database Authentication requires specific login credentials set up in the SQL Server database.
Read also : https://www.hituponviews.com/elevate-your-testing-skills-with-software-testing-courses-a-comprehensive-guide/

All Rights Reserved © 2023